🎨Painting and plaster
Streaks After Wall Painting: Causes and Fixes
By KABLAY Editorial · · 12 min read · Updated:
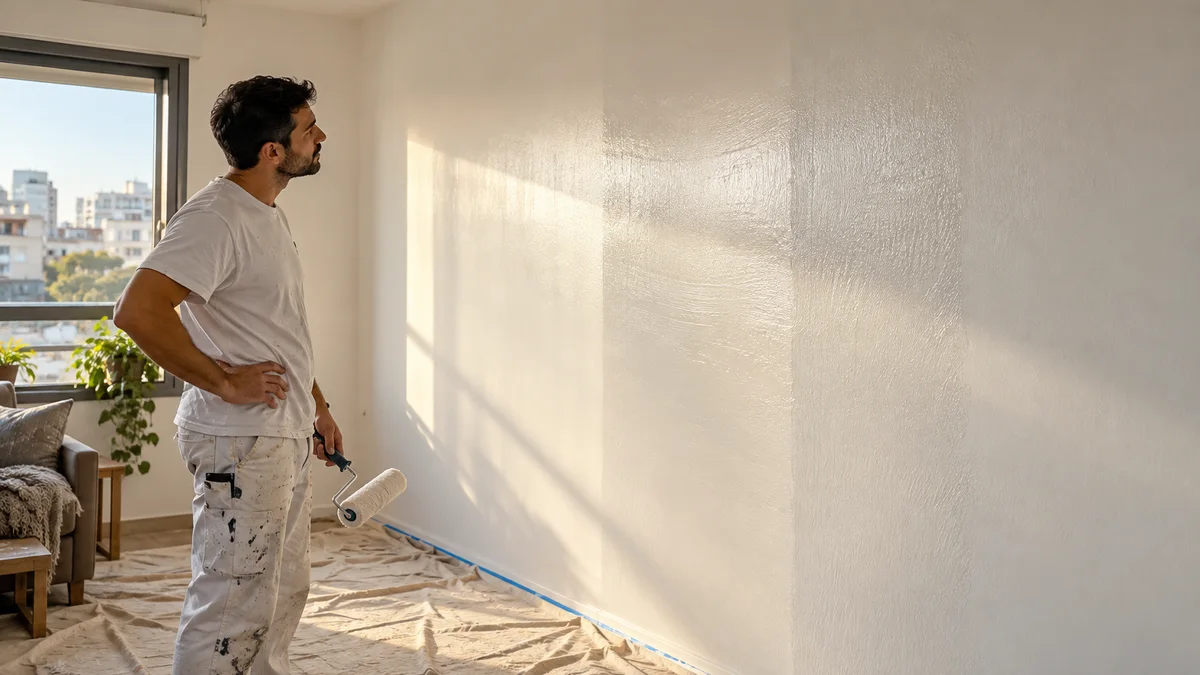
A newly painted wall looks even in the morning but shows bands in light coming from the side later in the day. Sometimes the sheen differs, sometimes the roller has left texture, and sometimes a repaired patch shows through a new finish. All may be called “streaks”, but they do not have the same cause or correction. Before ordering another coat, record what is visible after drying, under which light and where the boundaries fall.
This guide concerns acceptance and correction of a finished interior wall. For a project beginning with bare or damaged walls, see the plaster, filler and painting sequence. Here the main risk is choosing either endless small touch-ups or a complete room repaint before anyone has identified the problem. Either can be reasonable in the right circumstances; neither follows automatically from a photograph of a stripe.
Allow the specified drying period
Fresh paint can look uneven while it is drying. Ask what product was used and when its manufacturer permits inspection, ordinary contact and another coat. There is no single number of hours for every paint, wall and room condition. If someone offers to correct a band while the coating is still wet, first ask whether the appearance may change as it dries according to the product instructions.
Record the work date and known conditions: an open window, air conditioning, direct sunlight, room moisture, number of coats and color. These are context, not proof of a mistake. Do not rub a fresh finish or push furniture against it for a photograph. Once the coating has reached the appropriate state, take comparable photos. The discussion with the painter can then address the finished result rather than a temporary stage.
Show the wall under two lighting conditions
Take an overall view in the light normally used in the room and another at the side angle that reveals the band. Add a close image without editing contrast until the issue looks unlike reality. Mark where it starts and ends and whether it follows a window, former repair, socket or furniture position. Say whether the same marks are visible during normal room use. A flashlight held close to a wall can exaggerate texture that is not seen from the room.
Agree how the result will be checked: viewing point, fully dry finish and normal lighting conditions. This is not an excuse to hide a flaw in dim light. It makes an assessment reproducible. Oblique daylight may reveal a sheen band that is also visible normally, or it may overstate small relief. Compare the same place before and after correction rather than relying on impressions of a different wall.
Sheen variation is not necessarily a color mismatch
An area that looks similar straight on but lighter or darker at an angle may differ in sheen. Buying a “whiter” tin is not automatically the answer. Porosity, film thickness and application can affect the finish. Sherwin-Williams explains paint flashing as an appearance with several possible causes. The list does not establish which one applies in your apartment.
The painter needs the paint name and batch if available, a description of the old surface, primer and any local patches. A repaired area may absorb a new coating differently. Another coat without preparing the underlying cause might improve the appearance or leave the same boundary. Discuss preparation before painting over it and whether a controlled small test is suitable for the product.
Roller texture needs a different remedy
Raised roller marks may remain visible or tactile after full drying. They can follow the direction of passes or cluster where sections overlap. Do not rub them with a dry cloth to “smooth them out”. Preparing the texture and applying a finish again may involve more than adding a thin spot of paint. Sherwin-Williams guidance on brush and roller marks links the result to material conditions and tool choice rather than a single universal failure.
Not all texture is new damage. Older paint and the underlying plaster contribute to the finished look. Compare the affected area with the agreed sample and a neighboring part of the same wall. If a highly smooth wall was part of the original scope, the preparation stage should be in the work description. A fresh coat does not make the wall geometrically flat and cannot replace substrate work that was never ordered.
Filler patches can show through
A rectangle or circle where a hole was repaired may show a different texture or absorb paint differently. Provide photos of the preparation if you have them and say which materials were used. A photograph of the color cannot tell whether the patch needs primer, further surface preparation or a full-wall coat. First establish whether the filler is sound and even with its surroundings.
A small square touch-up on a large wall may itself become a new mark because its sheen, batch or application differs. Check any local test in daylight and evening light. If its edge remains visible, discuss finishing the whole wall up to natural corners instead of adding another island. That is a decision about this coating, not a blanket rule that any small defect requires repainting a whole room.
Moisture and weak paint change the task
If the band comes with bubbles, a damp mark or a coating that lifts, stop debating color alone. Establish whether the substrate is dry and fit for another finish. Paint over active moisture can repeat the problem. The guide to peeling paint describes signs that call for substrate assessment. Show them to the painter before asking for a decorative repair quote.
Equally, not every light stripe is a leak. Moisture is one possibility with additional evidence, not a diagnosis from color alone. If the cause remains uncertain, separate investigation from final painting. New paint should not be described as sealing an unknown problem away. If a water source is found, address it first and restore the base before judging the final coating.
Use a test patch to choose a method
Where the cause is not clear, a small agreed test is more informative than buying enough paint for every room. Specify the location, preparation, product, coating steps according to its instructions and the conditions for viewing it after drying. Do not place the patch so that it conceals the only visible boundary and leaves no comparison. Photograph before work, after drying and in the light where the defect originally appeared.
If the test removes texture but leaves a sheen difference, the next step changes. If nothing improves, simply repeating it across the room is weak reasoning. Ask the painter what they now believe causes the mark. Agree how the trial is priced and whether it is credited to a larger job if the provider offers that arrangement. Any additional operation needs your agreement before it begins.
Choose between a spot, a wall and a room
A local touch-up cannot blend equally well with every color or finish. Coating one complete wall between corners may be more predictable when a spot boundary remains obvious. Several walls may need a coordinated plan if their color and lighting are connected. First establish the defect, material and trial outcome. The aim is enough area to achieve the agreed finish, not the largest possible square-meter quote.
Separate preparation, sanding with protection, primer, paint, coats required by the product and cleanup in the estimate. If the old color is unknown, see whether there is a leftover tin with a readable label. “The same white” is not a specification. Confirm that floors, switches and furniture are protected, especially when correcting one wall in an occupied room.
Why neighboring walls may appear different
The wall facing a window and the one beside it receive light from different angles. Even identical paint may look different across those planes. Do not generalize from one wall to the whole room without comparing like areas. Check similar spots on the same plane, then consider the room as a whole. If a difference follows the light angle, record it and let the painter assess material and application.
If a color sample was approved before work, bring it back to the wall if available. A screen photograph cannot replace comparison beside the real finish in the room, although it records what was chosen. If a new paint batch is needed, discuss a small matching trial first. The final scope should follow the visible result rather than only the shade name printed on a tin.
Accept the correction once it can be judged
Inspect after the product's appropriate drying period, when viewing cannot leave fingerprints. Look from the agreed point in ordinary light and at the angle where the problem was noticed. Compare the photos. Do not expect a paint-only job to remove uneven wall geometry that was outside the scope, but do not accept a conspicuous new rectangle as a finished correction to a former band.
Check the floor, ceiling edge, sockets and nearby furniture for splashes. A sheen correction may not change the texture of older plaster; the limit of the result should be stated. Keep the product information for future care. Use the room as its manufacturer recommends rather than relying on a generic curing time borrowed from another paint system.
A request to a painter
“After the wall dried, stripes became visible in side light. I attached whole-wall photographs, close views and the location of a previous filler patch. The paint and batch are [known/unknown]; damp marks or bubbles are [present/absent]. Please inspect whether this is sheen, roller texture or the base, then quote a test patch and the boundaries of any correction. We will agree a complete repaint only after assessing the trial.” Fill in actual observations.
Compare responses in the painting service section by the proposed method as well as the price. A useful request makes the original defect visible and testable. It lets the painter explain a cause instead of adding another coat to an unknown problem.
Internal links
Useful pages on this topic
Frequently asked questions
- Can wall streaks disappear as the paint dries?
- Fresh paint changes appearance while drying. Judge it after the period specified for the product used before ordering correction.
- How do sheen bands differ from roller marks?
- Sheen variation often changes with viewing angle; roller texture may be felt after drying. The painter should inspect both possibilities.
- Is a small touch-up enough?
- Not always. A spot can leave a new boundary. A small dry test helps decide between local work and coating the complete wall.
- When should moisture be investigated first?
- Bubbles, damp marks or weak peeling paint call for assessment of the base and possible source before another decorative coat.